
Building a Church Live Stream Setup from Scratch


Building a church live stream setup can seem overwhelming and unnecessarily complicated. There are thousands of different gear combinations – hardware and software – you can put together. Figuring out if two pieces of tech are compatible, or if they work well in your tech ecosystem can be a nightmare.
But it doesn’t have to be.
In this article, we’re going to describe how we would build a church live stream setup from scratch. We’ll cover the pieces of tech we would purchase and why. And then give some ideas for alternatives to lower the budget or increase the features as needed, so you can get a good idea of how to apply this to your church live stream setup.
Church Live Stream Setup from Scratch
First off, the decisions we make in this article are really just our opinion. These opinions could change in any given circumstance if we were to know the exact specifications and budget a church could play with. But, after helping hundreds of churches get their live stream setup, this is kind of the general setup direction we see churches taking – especially those building their live stream setup from scratch.
What Equipment Is Needed?
For a church live stream, there are a few basic pieces of equipment necessary for a great live stream:
- Audio Source
- Cameras
- Production Tech (Switcher)
- Encoder
- Internet Access
About the Audio Mixer
Most churches already have a house mixer. This mixer will be connected to all audio sources and instruments, etc.. This mixer needs some kind of output to send the sound to the live stream tech.
Larger churches with larger budgets will often have a separate mixer or DAW (digital audio workstation) to mix their audio for the stream specifically. This can be done, and it doesn’t have to be expensive. However, most churches that are starting from scratch have a volunteer problem that keeps this from being a good idea. This problem is a lack of experience.
Unless you have a volunteer that knows how to use a DAW – or is well-versed in mixing tech and technique, then you probably want to go for simple and just mix down the live mix from your house mixer using a submix or monitor output.
About the Budget: $15K
Higher budgets don’t always mean more gear. Sometimes it just means better gear.
How much should a church live stream setup cost?
You can see how much we really spend at the end of this article.
It depends on what you want to accomplish, for real. Budgets can be anywhere from $2,000 to $200,000. However, for this example, we’re going to set our budget to $15,000 and try our best to come in under that number.
The Live Stream Cameras
We have an entire article on our favorite live stream cameras here. So, we won’t go into a lot of detail here.
We’ll just say that the choice is usually between PTZ and static cameras – or a mixture of both. While static cameras on a tripod or a handheld camera usually have a better-looking image, on a live stream the difference is negligible. Since PTZ cameras give us much more flexibility, and we can control multiple cameras with a single volunteer on a joystick controller, we’re going to build this live stream setup using PTZ cameras.
We want the best quality PTZ cameras for our budget. And, with a $15K budget, most of it will be taken up by our camera choices.
In this instance, we’re going to build this church live stream setup using BirdDog 30X zoom PTZ cameras.
Three BirdDog P200 30X
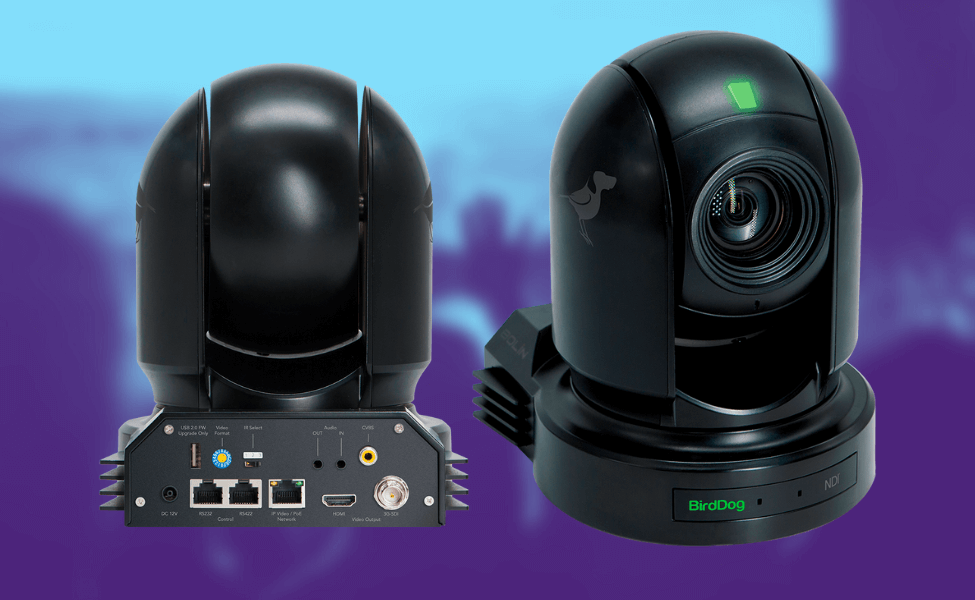
This camera is a powerhouse, and just a couple of months ago the BirdDog P200 would have cost about $3,000 per camera. However, they are on sale (at this moment) for $1995 per camera.
This camera features a broadcast-quality Sony CMOS sensor. It is fully NDI enabled. And also allows us to hardwire it to our Production Tech via SDI or HDMI cables – which we prefer.
It also has auto tracking if needed – and the NDI functionality actually means it can be controlled (pan, tilt, zoom) remotely over NDI. So, if your video volunteer team is out sick, they could still run your cameras from home over the internet using BirdDog’s cloud software. It’s really cool stuff!
How Many Cameras Do We Want?
Since we have $15,000 to spend, and these cameras are basically $2,000 a piece – we’re going to shoot for 3 total cameras.
Three cameras will give us great coverage of the platform, the speaker, and even the audience if we want to use it.
This video walks through camera placement:
The second camera we would place around the middle of the way to the front on the right side of the sanctuary.
The third camera would be placed on the opposite wall, but probably moved a little closer to the stage. This side would need to be opposite the musical instruments, so we could get a cross-stage shot of the musicians.
The Live Stream Production Tech
This is a lengthy way to say switcher – but not all switchers are the same. So production tech seems like the easiest way to encapsulate all this tech into a single category.
Basically, we’re talking about your live stream tool – the software or hardware you will use to “produce” the live stream. And by produce, we mean the creative choices of the show – which camera to show the audience, camera movements, and any graphics you want to show, etc. etc.
Hardware vs. Software
 This is a difficult choice to make. And one I’m always debating in my head and heart. I love streaming software – and eCamm is my favorite. It only works on Mac, though. So if you have a Windows PC, OBS would be my second favorite with Vmix coming in 3rd.
Software is awesome because it packs inside one device (the computer) all of the abilities of a room full of hardware devices. For example, the ATEM Mini Pro can only incorporate still images from its “media player.” To get a video player you need another piece of hardware. With software, you basically have no limitations aside from the abilities of your machine.
With that said, the software can bring some unexpected problems. For example, OBS recently released an exciting new update to version 28. Everyone rushed to get the new version only to find out it broke a lot of their necessary plugins. A ton of people were frustrated.
Software also can be a bit of a learning curve for those with no experience.
Hardware, on the other hand, is more limited but brings stability and simplicity to it. And it can be much cheaper if you embrace simplicity than plopping down $1500 on a graphics card for a PC.
So, for this build, we’re going to go with a hardware approach, but one that can be easily integrated with software if that’s a must-have for anyone.
The ATEM Mini Extreme
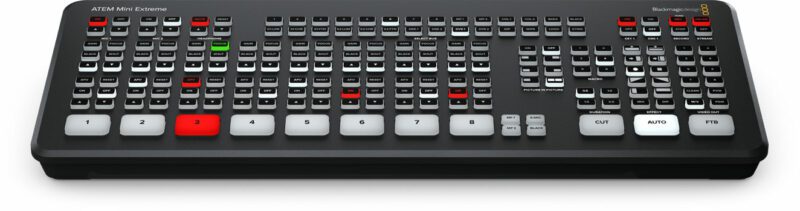
The Blackmagic Design ATEM line of switchers has become our favorite streaming hardware over the years. They are constantly innovating and updating this suite of tools, and the Blackmagic Brand is a leader in the industry.
The ATEM Extreme gives us some cool functionality:
- It has a built-in encoder, which means it can record and stream simultaneously without any computer.
- It allows for 8 total inputs (so 8 cameras if desired)
- It allows for 2 outputs
- One output will be the multi-view control monitor
- Two can be for an overflow room or IMAG if desired.
- It has Supersource – which most churches will never use.
- It can be remotely controlled by an iPad app
- It has the ability for keying downstream or upstream
- It has a headphone port for audio monitoring
- It has 2 USB ports
Without taking a ton of time to explain all of this, the main functions we’re going to use are the video inputs. Three of these inputs will be used for our BirdDog cameras. Another input (or two) can be easily used for Pro Presenter (or any other display software – even powerpoint or keynote will work) to bring in sermon slides and/or lower thirds to be keyed out and overlayed.
We will use one of the USB-C ports to connect an external hard drive so we can record with the push of a button.
The second USB-C port can actually be used to connect the device to a computer to be used with software like eCamm or OBS or Vmix if you are really attached to using software as the encoder.
PTZ Camera Controller
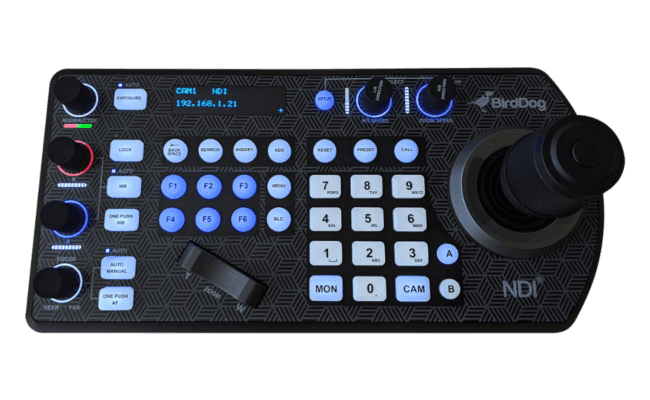
PTZ cameras can be controlled in a variety of ways, even from a web browser or mobile app. In fact, they even come with handheld remote controls, like a TV remote, that you can use to move them around. But, those are all inconvenient ways to control a camera.
For this build, we will use the BirdDog joystick controller.
With this controller, we can easily control each camera with the joystick, kind of like flying a plane. It will allow us to pan left or right by moving the joystick to the left or right. We can tilt the camera up or down by moving the joystick up or down. And we can zoom in and out by twisting the joystick handle.
There are other easy camera-operating knobs and buttons to help us get exposure and focus right in the moment without opening other web browsers or tools.
The presets also make managing a 3-camera live stream very simple. We can dial in a ton of presets for each camera, but we recommend limiting it to 9 per camera, so you can easily use numbered without trying to handle multiple entries.
POE Network Switch
This is often overlooked, but the cameras have the ability to get their power from their network cable if the switch is POE (power over ethernet) enabled.
Since we have 3 cameras, a joystick, and the ATEM Mini Extreme to network together, we will get an 8-port gigabit POE switch for this.
Each camera should be connected to the switch’s POE ports. The Joystick can be too, but it’s easier to get power to the Joystick location in the sound booth than to a camera on the ceiling. So we recommend using one of the non-POE ports for the joystick.
And, plugging the ATEM into the switch as well will ensure we have all of our pieces connected to the network.
Now, we just need to connect that POE switch to our router or network with an ethernet cable. I recommend at least a Cat6 cable so that the speed and bandwidth are sufficient for video usage – though the upload will really be the only video transmission in this setup. It’s great to be overkill on bandwidth.
The Required Cables
Connecting a live stream setup requires cables. I get calls all the time about wireless, and at this time, the only thing that is remotely wireless stable would be an HDMI feed. With PTZ cameras, you still need a networking cable to provide power and control capabilities.
If you’re going to run one cable, why not run two and hardwire your cameras in? The stability benefit alone makes it worth it.
At ChurchSetup, we include 100-foot cable packages per camera in our live streaming kits. So, this would be a 100-foot Cat6 cable and a 100-foot fiber optic HDMI cable.
About HDMI vs. SDI
A lot of people think you need SDI cables if you’re going to do cable runs longer than 30 feet – and this was true about 2 years ago. However, it’s not accurate anymore.
With a fiber optic HDMI cable, you can run 8K video up to 300 feet with no signal degradation. Don’t listen to anyone who tells you differently. We’ve done it for a long time, and all our clients are happy.
There’s nothing wrong with SDI, of course. It’s just for most churches, using any SDI devices means you’ll also need converters to convert the SDI back to an HDMI in many instances. So, while SDI is still good and stable, we’ll use fiber optic HDMI cables for this build.
Plus, since the ATEM and our cameras are only 1080 devices, an 8K transmission cable will have more than enough oomph to get us taken care of.
Audio Cables and Adapters
Since we’re pulling in audio from our church’s house mixer, we’ll need some kind of cable and adapter to connect the mixer to the back of the ATEM Mini Extreme.
Most modern audio mixers have XLR outputs. So we’ll need an XLR cable, and an adapter to turn the XLR to a 3.5mm male jack to go into the ATEM Mini Extreme.
Additional Tech Needed
A High-Speed External SSD – We will want to add a 1TB SSD to let us easily record at the touch of a button. The Samsung A7 works really well for this. The A5 does too, but the A7 is faster.
Wall Mounts – We also want wall mounts for each camera, so we can mount them to the wall and get them up and out of the way. This will make the cameras virtually “disappear” from our church service while giving us great video angles for the live stream and recordings.
 Multiview Monitor – If you already have a computer monitor, you can use it for the ATEM’s multiview. But since we’re building from scratch, we’re going to use a monitor in this setup as well.
One of our favorite monitors is the Sceptre brand. They are inexpensive but reliable and the image is of great quality. We use these in just about every setup we build.
One reason we like the Sceptre monitors is that they have an audio jack on the back you can plug headphones into. If you were using the ATEM Mini Pro, there’s no way to easily monitor the audio because the Pro has no headphone output.
We are using the ATEM Mini Extreme, though, and it does have a headphone port. So even though we don’t need the headphone port on the back of the monitor, we’ll still use a Sceptre monitor because we just like them.
Restream – This tool is an absolute must for a volunteer-friendly church live stream setup. This tool allows you to push one button on the ATEM and go live on multiple platforms. Without it, you’ll have to manually publish your streams on Facebook or YouTube. Restream can do it automatically – see the video below.
Building the Church Live Streaming Kit
Now that we have all the items listed, we must connect them all together. It looks a little like this:

Here’s how it’s built:
- Connect the Gigabit POE switch to the main router via an ethernet cable
- Connect the cameras, joystick, and ATEM Mini Extreme to the POE switch as well
- Connect the cameras to the ATEM Mini Extreme via the fiber optic HDMI Cables
- Connect the ATEM Mini Extreme to an output on the church audio mixer (soundboard) designated for the live stream audio.
- Program the Joystick with the camera’s IP addresses.
- Since we networked everything, the cameras and joystick will get an IP address automatically. But we want to switch that to manual now they are all connected.
- Get my Restream key and program it into the ATEM Mini Extreme via the ATEM software (free).
- Plug in the hard drive to the USB-C port.
- We’re done – we can go live now.
What If We Want to Play a Video?
Most churches use some kind of screen display, either with projectors, LED walls, or large television screens. Thus, they have some kind of software for this. Small churches might be using PowerPoint while most churches use a presentation software like ProPresenter (which I love!).
We’re going to assume this church has Pro Presenter already. Therefore, I just need to get an HDMI output from that machine and plug it into one of the available inputs in the ATEM Mini Extreme.
It’s that easy – see the video below:
How Much Does This All Cost?
Well, we started with a budget of $15,000 – how did we do?
The price of this entire setup is $d plus or minus a little bit for shipping.
So we saved $3509.85 with a total spend of around $11579.15.
We Actually Sell This Entire Kit
If you want, you can source all these items yourself. Or, you can get the all-in-one kit here. This 3-camera live streaming kit includes all the times we talked about in this article.
As long as you have a wired connection to your router, and an available output on your soundboard (mixer), you won’t need anything else to go live.
https://churchsetup.com/product/birddog-3-camera-ptz-streaming-kit-30x-zoom-atem-mini-extreme/
If you have any questions, let us know in the comments. We’ll do our best to help!
Very useful article.
Looking to upgrade the system in our sanctuary. We use Zoom to stream our services to our congregation. looking to understand the difference between the Birddog 100 and 200 cameras,
I am guessing that we would use a software based system that would also be used to connect to the zoom meeting?
We may want to add FB streaming in the future and we do always use the same zoom meeting for all our calls.
If we need a PC for this, what is the recommended configuration?
Thanks
Hey, thanks for the question!
Honestly, if it was me, I would just build my video setup with the ATEM Mini Pro – you can connect that to whatever machine you’re using for Zoom, and Zoom will see the ATEM as a video/audio source. THen, if you want to stream to FB, you can either have Zoom repeat the stream in the settings, or you can tell the ATEM to stream directly to Facebook even if you’re also using it for Zoom.