
How Do I Find the IP Address of My PTZ camera?


Probably the most common tech support request we receive is about the networking aspect of working with PTZ cameras. In order to control them and configure them, you have to be able to communicate with them.
This is done over the network, which means each camera needs an IP address on your network.
Don’t worry. At ChurchSetup, we’ve helped hundreds of churches and schools configure their cameras and get them networked correctly. And, in this article, we’ll show you the quickest was to get yours connected as well!
Is it hard to find the IP address of a PTZ camera?
The answer to this question is almost always “no.” It’s usually very easy. The only times it gets frustrating for us is when a church has an unnecessarily complicated network setup. Usually, this is because a member of the church has experience in IT, and rather than setting up a simple network, they get “fancy” with it.
It’s cool they can get fancy, but when they aren’t around, no one else can figure it out.
For example, we tried to help one church that had a network with several different routers, all working different subnets. The computers we were connecting to remotely were on a completely different network than the cameras. And the volunteers that were trying to setup the cameras didn’t even know how many routers there were, or which router they were connected to.
In those cases, you need to get that IT person in the room to demystify their nerdy networking decisions. However, in 90% of cases, churches have a rather simple network setup. And in those cases, it’s easy to find the IP address of your camera.
So let’s get into it.
Quick Info Dump
An IP address is a set of 4 numbers, which can be between 1 and 3 digits long. Each set is separated by a period. It will look like this: 192.168.1.55.
Consider your house and how you get mail. The way the mailman knows your bills come to your mailbox is because of the address on the envelope. On the internet, data is sent in “packets,” kind of like envelopes. The way the internet knows to show aol.com to your browser and not another browser on the network is because of the address associated with the packets of data coming in. If they are addressed to your computer, the digital mailman will drop them off in your browser.
Now, just like zip codes, IP Addresses also have a thing called a subnet. This is the first three sets of numbers in the IP address. In the example above, the subnet is 192.168.1 – this means for one device to communicate with another, they must both be on the same subnet – kind of like they must both be in the same zip code.
Quick Need-To-Know Definition
There are two ways for a device to get an IP address: manually assigned by hand or automatically assigned by the router. This is one thing a router does, it assigns devices IP addresses.
When you connect your phone or laptop to a new network, the first thing that happens is that the router detects a new device and assigns it an IP address. This process is referred to as DHCP.
DHCP simply means getting an IP address automatically from the router.
Step 1: Check the Camera Manual for Default Information
All PTZ cameras come with default settings. And the camera’s default will impact how you go about getting its IP address.
Some cameras come set to manual (or static) IP addresses out of the box. Others come set to DHCP by default.
Most PTZ cameras we work with come default to DHCP, meaning they will first try to communicate with a router to get an IP address automatically. If it cannot do that successfully, it will set to its default IP address.
If a camera stays on its default IP address, it’s almost certain to be on a different subnet than your network.
For example, if you connect PTZOptics camera, the default IP address is 192.168.100.88. If the camera can’t communicate with a router on power-up, it will set its ip address to that number. If your subnet is 192.168.1, you won’t be able to communicate with that camera.
So first step, determine if your camera defaults to DHCP – and if it is, process to step 2.
Step 2: Connect the Camera To Your Network Before Powering On
You should connect your camera via ethernet to your network, so that when you power it on, it can quickly find and communicate with your router.
This is where most people make the mistake. They power on the camera, and then connect it to the network. The problem is, by the time you plug in that connection, the camera has already tried and failed to reach a DHCP server. Which means that it’s probably already sitting on its default IP address.
If you made this mistake, disconnect the camera from power, and ensure its ethernet cable is going to reach the router.
If you are using a POE switch, make sure to connect that POE switch to the network first, before connecting an ethernet connection to your camera.
PTZ Diagram (IF PURCHASED) 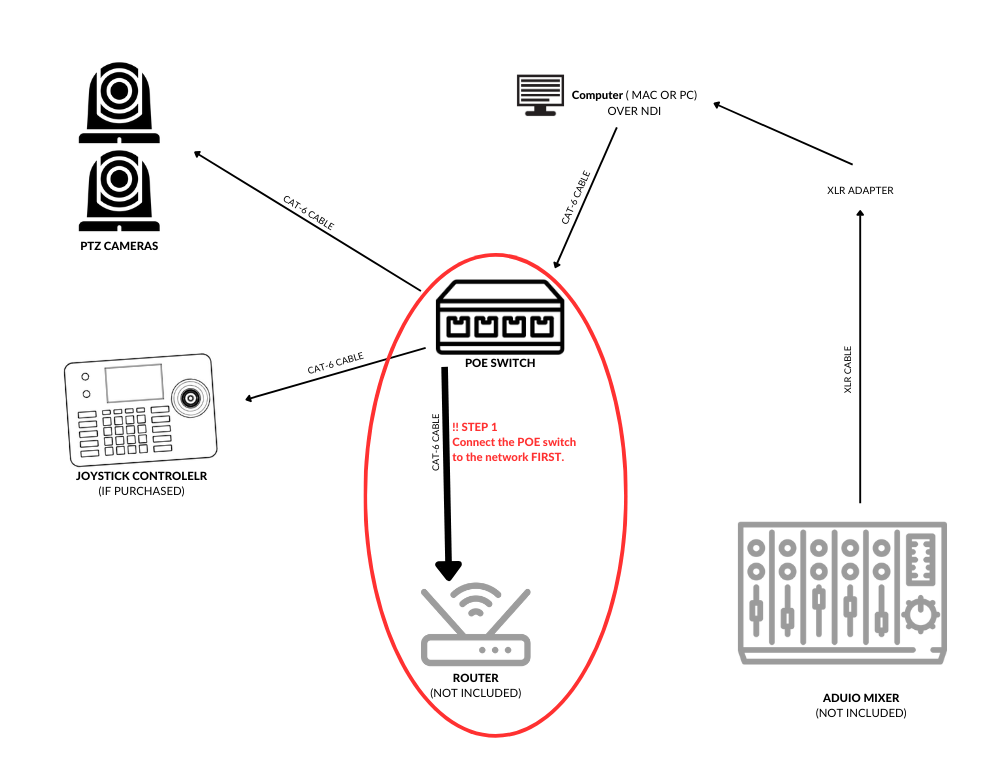
Step 3: Search for Your Camera
This is again where a manual is good to check. Each manufacturer has a method or app for finding your camera’s IP address.
For PTZOptics cameras, loading a browser to PTZOptics.local will usually find the camera. You can also download their Camera Management Platform that will find multiple cameras at once and show you their IP address. In many cases, just rebooting the camera works because the camera will display it’s IP address on the monitor when it first boots up – though it only stays on-screen for like 1 second, so you have to be quick.
Canon PTZ has an app that can be used to find the cameras.
If all else fails, I’ve found that using a MAC OS app called IP Scanner allows me to quickly find a camera on my network. There are Windows-based apps as well, but you have to be careful and only download apps on Windows you know are virus free.
Step 4: Claim Permanent IP Addresses for Each Camera
The problem with DHCP is that, it’s possible for the camera to get another IP address when it boots up the next time. If you are using a joystick controller, this will cause them to stop communicating as the joystick is trying to send commands to the camera’s old address.
Assigning your cameras a “fixed” or “static” IP address means they will always keep that same address.
Again, using PTZOptics as an example, once they get an IP address through DHCP, all you have to do is log in to the web-based control panel (go to the camera’s IP address in a web browser), go to the network settings and flip the toggle from DHCP to “fixed.” This will cause the camera to store its DHCP-acquired address permanently or at least until you change it again.
Quick Note on IP Addresses
If you power off your cameras, just know their IP addresses are now “unused,” according to most routers. If another device takes that IP address while the camera is asleep, and then you power the camera up, it won’t be able to connect as both devices try to use the same IP address.
An example: we had a church install three cameras and set them all up. This church would power down its entire system after the Sunday service. However, several months later, the church school (in the same building) had a security company install security cameras. The company that installed the cameras scanned the network and saw a group of available IP addresses. So they manually set their cameras to those IP addresses.
The problem is, that the security cameras never power off. So they have a claim to those IP addresses, which were the same ones assigned to the broadcast cameras.
On the next Sunday, the church came in and powered everything on, but the joystick could not communicate with the cameras. They couldn’t access the camera’s control panels. When they tried, their browser loaded a security app instead.
Why?
Because the cameras couldn’t live at their IP address. It was like squatters moved in while they were away, and now they can’t get back home.
In this case, the security company or the church has to change their camera’s IP addresses.
So, just know, if you power your cameras down completely – it’s possible that while they are dormant, another device (computer, mobile phone, etc) can steal their address and cause connectivity issues later.